Getting started
From an empty Ubuntu host to a live MXL flow with a known writer: requirements, three ways to install, and a first walkthrough.
Requirements
- Ubuntu 24.04. Other recent Linux distributions work; only Linux exposes
/proc/locks, which flow activity detection relies on. - Docker Engine (
docker-ce) with the daemon running. EASY MXL must be able to open the Docker socket: run it as root (the systemd unit does) or as a user in thedockergroup (sudo usermod -aG docker $USER && newgrp docker). The one-line installer installs Docker Engine when it is missing; otherwise follow the Docker docs or the hands-on WSL/Ubuntu preparation. - Node.js >= 20 (22 recommended) - only when you neither use the installer nor the
container image. Ubuntu's own
nodejspackage is too old; use NodeSource. - python3 (optional). MXL timestamps are TAI; with
python3present EASY MXL readsCLOCK_TAIfor the exact TAI-UTC offset, otherwise it estimates the offset from live flows. - Network access to
ghcr.io(and Docker Hub forbluenviron/mediamtx) for image pulls. Behind a corporate proxy configure the daemon, not just your shell:/etc/systemd/system/docker.service.d/http-proxy.confwithEnvironment="HTTPS_PROXY=http://proxy:3128" "NO_PROXY=localhost,127.0.0.1", thensystemctl daemon-reload && systemctl restart docker(Docker docs). Some apps also install a codec package from the Ubuntu archive on first start (see the catalog notes). - Shared memory size.
/dev/shmdefaults to 50 % of RAM. A 1080p video flow at the default 200 ms history needs roughly 25-30 MB (four times that for 2160p), so the default is plenty for a handful of flows. To enlarge it addtmpfs /dev/shm tmpfs defaults,size=16G 0 0to/etc/fstabor runmount -o remount,size=16G /dev/shm. Alternatively use the hands-on tmpfs mounttmpfs /Volumes/mxl tmpfs defaults,noatime,size=512M,uid=1000,gid=1000,mode=0755 0 0(EASY_MXL_TMPFS_VOLUMES=1with the one-line installer,--tmpfs-volumeswith the repository script) and start EASY MXL with--domain-root /Volumes/mxl. On WSL 2/dev/shmmay be disk-backed; use the/Volumes/mxlmount there.
Default ports: 9700 (EASY MXL),, 9600-9606 and 9699 (app UIs), 8554 / 8889 / 8189-udp (MediaMTX, host network), 8200-8210/udp (MXL to WebRTC direct mode).
Install
Three routes; pick one.
curl -fsSL https://github.com/CLOUDflex-broadcast/easy-mxl/releases/latest/download/install.sh | sudo bash
The script installs Docker Engine if it is missing, Node.js 22 if it is missing, and the
latest release to /opt/easy-mxl. It installs a systemd unit that listens on
0.0.0.0:9700, writes /etc/default/easy-mxl with a random EASY_MXL_TOKEN and prints
the URL and the token. Keep the token: the web UI asks for it on first use.
Options are passed as environment variables:
| Variable | Effect |
|---|---|
EASY_MXL_VERSION=v0.1.0 |
install that release instead of the latest one |
EASY_MXL_TMPFS_VOLUMES=1 |
also add the hands-on /Volumes/mxl tmpfs entry to /etc/fstab and mount it |
curl -fsSL https://github.com/CLOUDflex-broadcast/easy-mxl/releases/latest/download/install.sh \
  | sudo env EASY_MXL_VERSION=v0.1.0 EASY_MXL_TMPFS_VOLUMES=1 bash
To remove the installation again, run the same script with --uninstall:
curl -fsSL https://github.com/CLOUDflex-broadcast/easy-mxl/releases/latest/download/install.sh | sudo bash -s -- --uninstall
Every GitHub Release carries easy-mxl-<version>.tar.gz (prebuilt: dist/ plus
production node_modules), SHA256SUMS and install.sh, so you can also download and
read the script before running it. See Deployment for what the unit
does and how to change its settings.
Needs Node.js >= 20 and Docker on the host.
git clone https://github.com/CLOUDflex-broadcast/easy-mxl.git easy-mxl
cd easy-mxl
npm ci
npm run build
npm start                      # = node dist/bin/easy-mxl.js
Open http://localhost:9700. The server binds to 127.0.0.1 by default; pass
--host 0.0.0.0 --token <secret> to reach it from another machine.
node dist/bin/easy-mxl.js --help lists all flags; see Configuration.
Instead of building, you can unpack the prebuilt easy-mxl-<version>.tar.gz from a
GitHub Release (verify it with
sha256sum -c SHA256SUMS --ignore-missing) and run node dist/bin/easy-mxl.js from the
unpacked directory.
To run a checkout or an unpacked tarball as a service, use
sudo scripts/install-ubuntu24.sh (Deployment).
The image ghcr.io/cloudflex-broadcast/easy-mxl is tagged with the release version,
major.minor and latest.
EASY_MXL_TOKEN="$(openssl rand -hex 16)"; echo "token: $EASY_MXL_TOKEN"   # keep it, the UI asks for it
docker run -d --name easy-mxl --restart unless-stopped \
  --pid=host --cgroupns=host \
  -v /var/run/docker.sock:/var/run/docker.sock \
  -v /dev/shm:/dev/shm \
  -p 9700:9700 \
  -e EASY_MXL_TOKEN="$EASY_MXL_TOKEN" \
  ghcr.io/cloudflex-broadcast/easy-mxl:latest
Every flag matters:
-v /var/run/docker.sock:...gives the container the Docker API; it is root-equivalent on the host, so always set a token and publish the port only where you trust the network (-p 127.0.0.1:9700:9700keeps it local).-v /dev/shm:/dev/shm- the domain root must be visible at the same absolute path inside and outside the container. When EASY MXL launches an app it asks the daemon to bind mount<domain path>, and the daemon resolves that path on the host. With another root (for example/Volumes/mxl) mount it at the identical path and set-e EASY_MXL_DOMAIN_ROOT=/Volumes/mxl.--pid=host-/proc/lockslists lock holders by PID as seen from the reader's PID namespace. In an isolated namespace the writer processes of other containers show up as PID 0 and cannot be mapped to a container through/proc/<pid>/cgroup; sharing the host PID namespace makes writer detection work exactly as on the host.--cgroupns=host- on cgroup v2 hosts (stock Ubuntu 24.04) a container gets a private cgroup namespace, in which/proc/<pid>/cgroupof other containers' processes no longer contains thedocker-<id>.scopepath; without the host cgroup namespace flows show as active but without a writer container name.
The image is node:22-alpine plus python3 (for the TAI offset) and the production
dependencies; EASY_MXL_HOST=0.0.0.0 is preset and port 9700 is exposed. Details and
caveats in Deployment.
Your first flow in five minutes
- Open EASY MXL. Browse to
http://<host>:9700. When a token is configured (the installer generates one, the container example sets one) the UI asks for it once and stores it in the browser. - Create a domain. Under Domains & Flows create the domain
domain_1(label and buffer depth are optional). EASY MXL creates/dev/shm/mxl/domain_1withdomain_def.json, owned by uid 1000 when EASY MXL runs as root so the hands-on writer tools can use it too. -
Launch the Test Generator. Click Launch app, choose Test Generator, select
domain_1and press Launch. The image is pulled on first use; progress is shown in the dialog.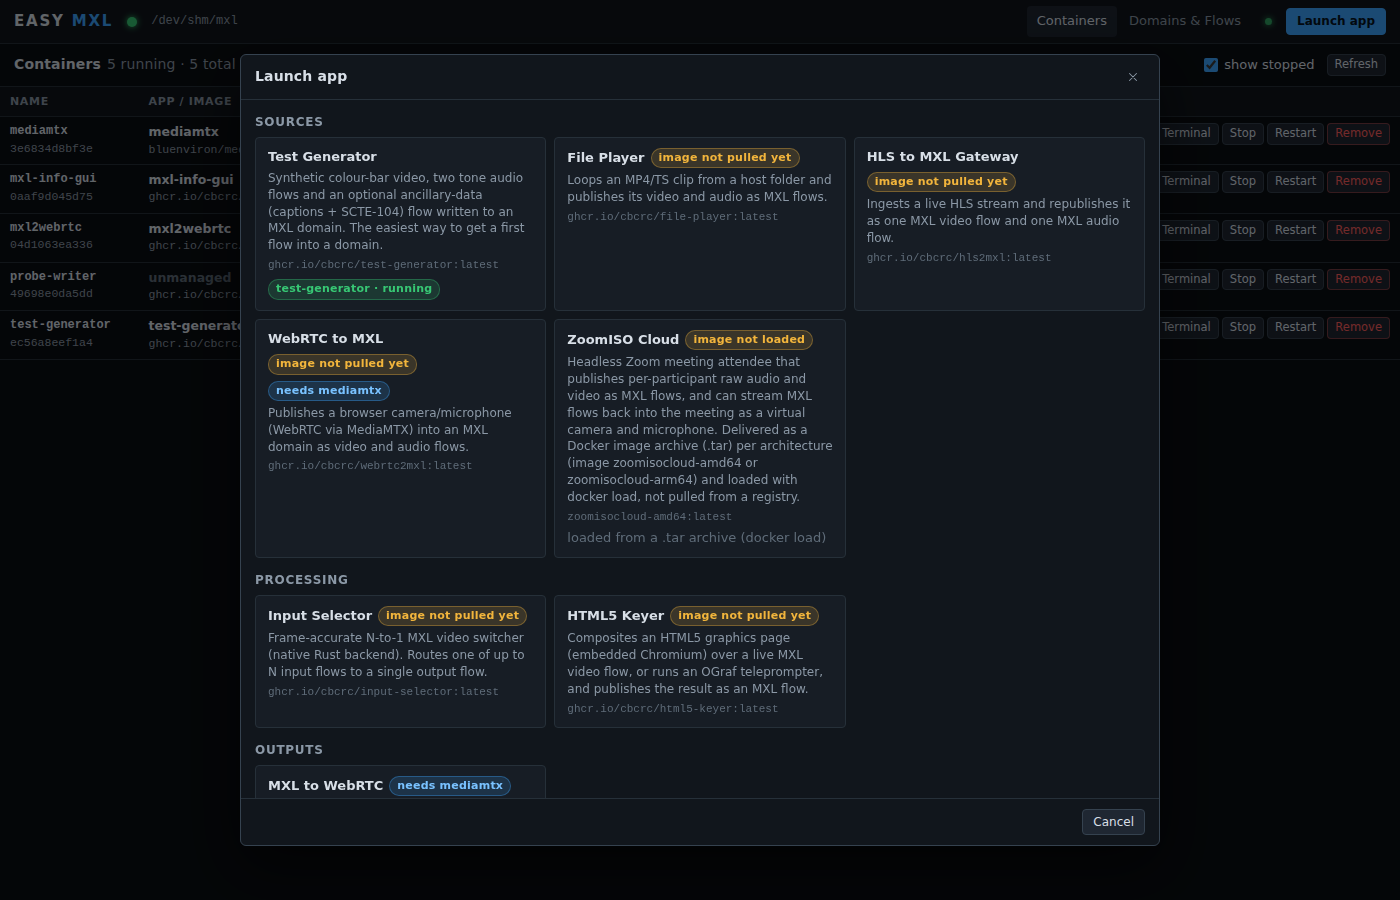
-
Start the pipeline. Press Open UI on the
test-generatorrow. In the Test Generator pick the domain under/mxl-domain, name the flows and press Start. -
Watch the flows. Back under Domains & Flows ->
domain_1, the video and audio flows appear as active withtest-generatoras writer, a live head index, latency and last-write age.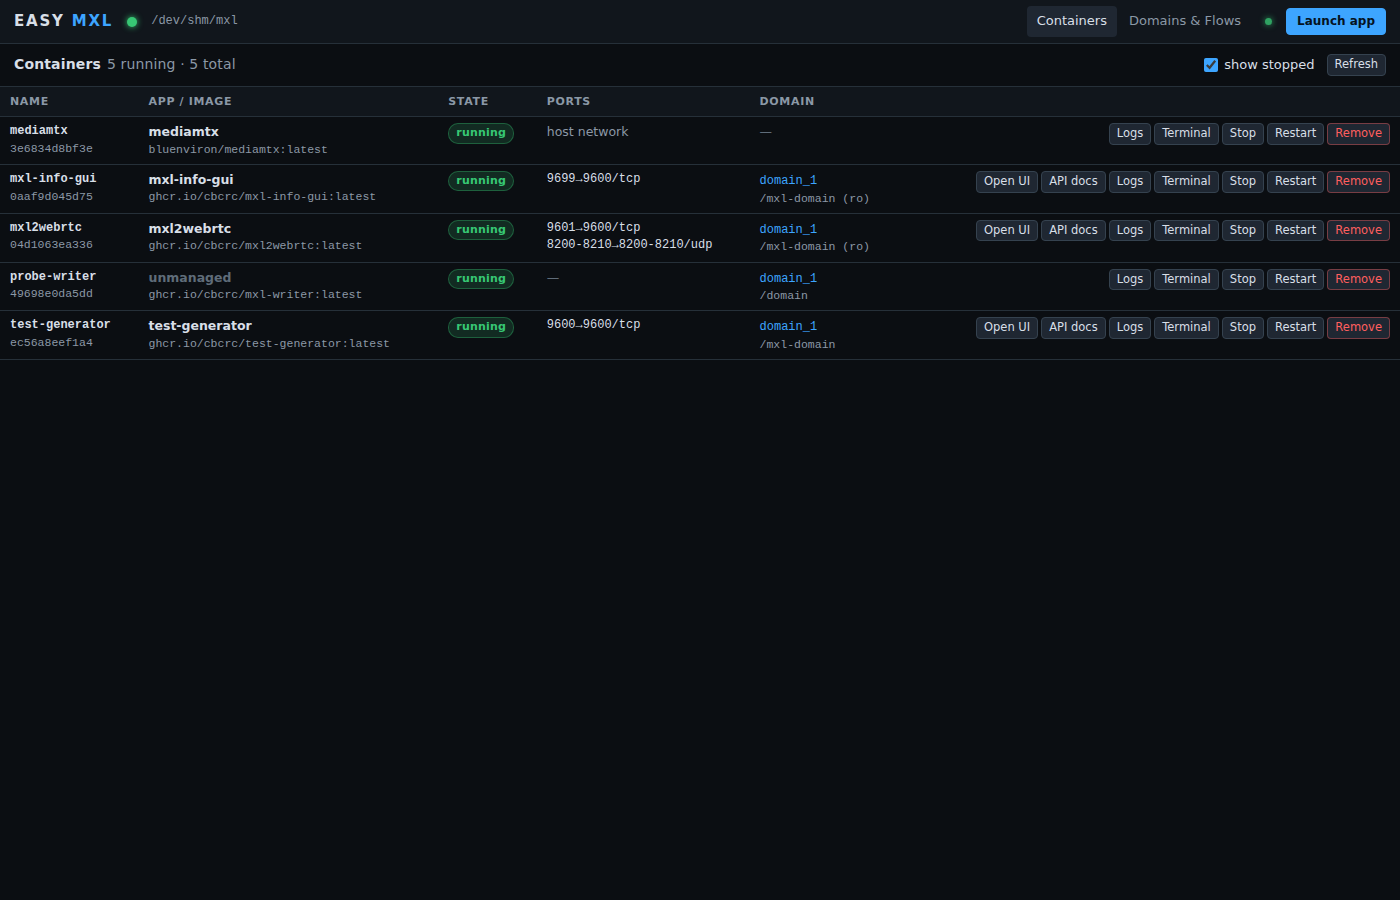
From here, launch MXL Info GUI (the official mxl-info view of the same domain) and / or
MXL to WebRTC (MediaMTX is launched automatically as a dependency), press Open UI,
pick the flows and watch them in the browser. The whole catalog is described under
Apps; what you are looking at is explained under How it works.